If you’ve ever landed on a website and thought, “Where do I start?”, chances are the site didn’t have a clear menu. And if you’re building your own site — especially for the first time — this guide will show you exactly how to add a menu to your website that makes sense, feels friendly, and helps visitors move around with ease.
Whether you’re blogging, building a digital shop, or simply sharing something meaningful, a clear menu is essential.
What Is a Website Menu, Really?
Think of your website menu as a navigation tool — like a shop directory or a signpost in a garden centre. It helps visitors find their way without getting overwhelmed or lost.
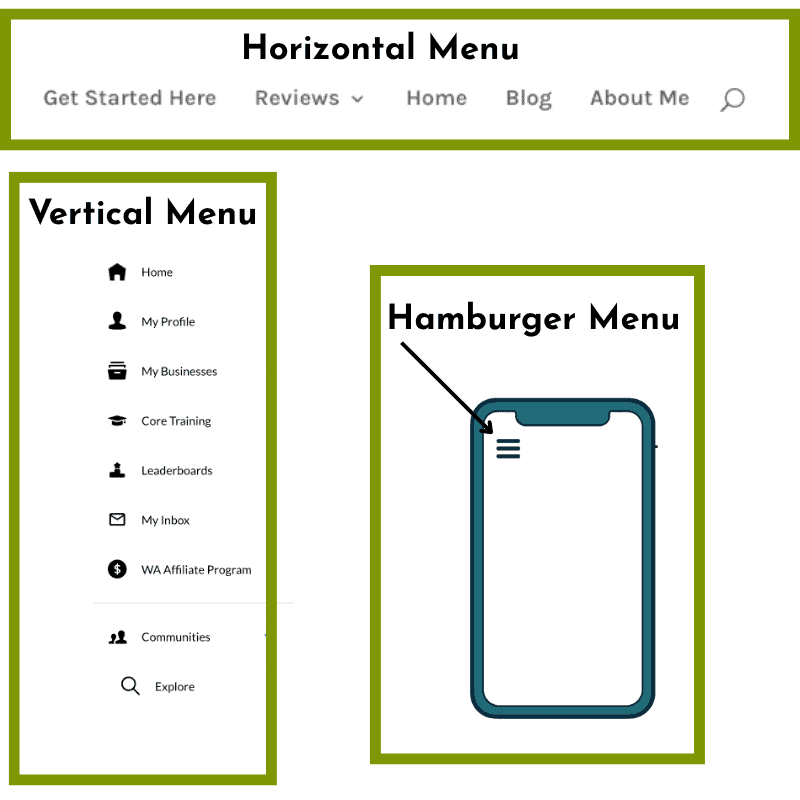
Menus typically live at the top of your page (horizontal),
on the side (vertical),
or tucked into a corner on mobile devices (like the little “hamburger” icon).
Depending on how your site is built, menus can reveal dropdown options, highlight popular pages, or quietly guide your visitor from post to post.
They don’t need to be flashy — but they do need to be clear.

Step-by-Step: How to Add a Menu to Your Website
Let’s take this slowly. Here’s how to add a menu to your website in a way that feels purposeful — not rushed or chaotic.
1. Plan First
Start by listing out your main content areas. Ask yourself:
- What are visitors coming here for?
- What do I want them to find quickly?
Group related topics together. Keep it simple — no more than 5–7 top-level menu items is a good rule of thumb.

2. Match the Menu to Your Site’s Purpose
A blog often works best with a horizontal menu that includes “Home,” “Blog,” “About,” and “Contact.”
If you’re running a store, dropdowns may help organise categories like “Shop by Topic” or “Bundles.”
Sites built through platforms like Wealthy Affiliate (which includes WordPress hosting and support) often make this process easier, as they provide beginner-friendly tools to create and manage menus — without any code.
3. Build the Menu (Tools You Can Use)
- WordPress: Go to Appearance > Menus
Create a new menu, name it something clear (like “Main Menu”), and start adding pages. - Divi Users: Use the Divi Theme Builder to style your menu and preview it across devices.
- Canva (for visual mockups): If you want to plan the look before building, a simple sketch can help.
If you’re not using a platform like WordPress, you may need to explore tutorials for your builder (e.g. Wix, Squarespace), but the concept remains the same.
4. Choose a Style That Suits Your Audience
For your readers, clarity is kindness.
- Stick with strong contrast between text and background
- Use clear fonts, like Arial or Georgia
- Avoid too-small dropdowns — they’re fiddly on mobile
Accessibility matters. Your site should be easy to explore for everyone — including those using screen readers or keyboard navigation.

5. Test and Refine
Once you’ve added your menu:
- Test it on a desktop, tablet, and mobile phone
- Click every link — does it go where it should?
- Ask a friend or family member to try it (ideally someone not “techy”)
Adjust anything that feels clumsy or confusing. A few tweaks now save lots of visitor frustration later.
Your Menu: Best Practices
Here’s how to keep your site menu working for you — not against you.
- Use plain language: “About Me” works better than “Who Am I?”
- Keep it visible: Don’t make visitors hunt for it
- Link internally: If you write a new blog post, make sure it fits somewhere in your navigation
- Avoid clutter: Too many menu items create decision fatigue
And yes — make sure your menu supports your website’s goals. Whether you’re helping people learn, shop, or simply read along, your menu should make that easier.
You might also enjoy this beginner-friendly overview of website menus from WPBeginner — written in a straightforward way with visual aids that align with your learning style.
And Finally…
Have you created a menu you’re proud of? Or perhaps you’re still unsure what to include?
Tell me in the comments — or share what you found most confusing when first learning how to add a menu to your website.
Your experience might help someone else take that next step, too.


