One:  Choosing A Niche

One: Choosing A Niche

Today we are going to choose a niche.  We will work together and before you know it, you will have an online presence.  This isn’t a race so take your time to get to grips with each step.  If you come to one of those times when you don’t know which way to turn(and we’ve all had them!) reach out by contacting me by using the box at the bottom of the page.  I’d love to hear from you with any issues or any successes.  Chat soon.

One: Choosing Your Niche

Your guide To Finding Your Online Sweet Spot

Let’s face it—the online world can feel like a giant buffet. There are so many options, and it’s easy to feel overwhelmed, wondering what to focus on or where to start. Without a clear direction, you might end up sampling everything. And we all know how that can end!!!

If you set up an account at Wealthy Affiliate you will be able to access the niche finder if you’re stuck for ideas

Wealthy Affiliate

That’s where choosing a niche comes in. A niche is your special corner of the internet—your theme, your focus, your unique flavor. It’s like picking your favorite dish at the buffet. Whether it’s spicy tacos, comforting mac and cheese, or a delicate slice of cake, finding your niche will give you purpose, direction, and, most importantly, a reason for people to pay attention to you.

Here’s how to figure it out without feeling overwhelmed or lost:

Step 1. Think About What You Love (Even If It Sounds Silly!)

What lights you up?

What makes you feel like you could talk about it forever, even if nobody asked? Maybe it’s cooking ridiculous snacks, fixing old sewing machines, or tinkering with old cars. Whatever it is, that’s a clue to your niche.

Don’t overthink it! You don’t need to be the world’s leading expert in anything. (Spoiler: Most people aren’t.) You just need to enjoy what you’re doing because that enthusiasm is what will make others want to join you.

Niche selection

Step 2: Ask, “Who’s Interested in This?”

Once you’ve got an idea of what you love, think about who else might love it, too. These are your “people”—your audience, your online buddies. For example:

  • If you’re into gaming, your “people” might be other gamers looking for tips, reviews, or hilarious fails.
  • If you’re all about fitness, maybe your audience is busy parents who want quick workouts they can do while their kids are napping.
  • If you’re into crafting, your crowd could be DIY enthusiasts who want easy, step-by-step projects.

Think of it like forming a club. Who do you want in your club, and what will you all talk about?

Step 3: Check What’s Already Out There

Secret Sauce

Before you commit to your niche, take a peek at what’s already out there. Type your idea into Google, YouTube, or social media platforms. Are there other people doing similar things? That’s good news! It means there’s an audience for it.

But here’s the secret sauce: Think about what makes you different. What unique twist can you bring? Maybe it’s your sense of humor, your storytelling skills, or your ability to make something complex super simple.

This your Unique Selling Point (USP)

Step 4: Start Experimenting

Don’t wait for the perfect idea to hit you. Perfection is a myth, and trying to achieve it will keep you stuck. Instead, start experimenting. Post a few things in your niche and see what happens. Here are some ways to dip your toes in:

  • Make a short video explaining something cool in your niche.
  • Share tips or ideas on social media.

Pay attention to what feels fun and what gets a response. If something flops, that’s okay! It’s all part of the process. Think of it like sampling different dishes at the buffet until you find your favorite.

Step 5: Stay Consistent (But Keep It Enjoyable)

Once you’ve got a niche you like, stick with it for a while. It’s like nurturing a plant—you have to keep showing up if you want it to grow. But don’t turn it into a chore. If it starts to feel like work, go back to Step 1 and remind yourself why you picked this niche in the first place.

The online world is big enough for everyone, including you. Your niche doesn’t have to be perfect, and nor do you. You just need to show up, have fun, and share what you love. The rest will follow.

So, what are you waiting for? It’s time to choose your focus and dive in. The internet buffet is open, and your niche is waiting!

Here’s a little transparency: My website contains affiliate links. This means if you click and make a purchase, I may receive a small commission. Don’t worry, there’s no extra cost to you. It’s a simple way you can support my mission to bring you quality content.”

12 + 4 =

SEO Starter Guide for Beginners

SEO Starter Guide For Beginners

Follow these easy steps to help your website rank higher on search engines:

1. Choose the Right Keywords

Why it’s important: Keywords help search engines understand what your content is about. Choosing the right ones ensures your site reaches the right audience.

How to do it:

  • Use Google Keyword Planner to find popular search terms related to your niche.
  • Try Ubersuggest for suggestions and competitive analysis.
  • Focus on long-tail keywords (phrases with 3-4 words) as they are less competitive.

Example:
Instead of targeting “recipes,” use “easy dinner recipes for beginners.”

2. Optimize Your Page Titles

Why it’s important: The page title is the first thing users and search engines see, so it needs to be clear and keyword-focused.

How to do it:

  • Include your primary keyword in the title, ideally near the beginning.
  • Keep it under 60 characters to ensure it doesn’t get cut off in search results.

Helpful Tool: Use Yoast SEO (for WordPress) to check your titles.

3. Write Meta Descriptions

Why it’s important: Meta descriptions provide a snapshot of your page in search results and can influence click-through rates.

How to do it:

  • Keep it under 160 characters.
  • Use active language and include your keyword.
  • Add a call to action like “Learn more” or “Download now.”

Example:
“Discover easy yoga poses for beginners and start your journey today. Step-by-step guide included!”

4. Use Headers to Organize Your Content

Why it’s important: Headers (H1, H2, H3) make your content easy to read and help search engines identify the main topics.

How to do it:

  • Use one H1 for the main title of the page.
  • Use H2 for subheadings and H3 for sub-subheadings.
  • Incorporate keywords naturally in your headers.

Helpful Tool: Test how your headers look using WebPageTest.

5. Optimize Images

Why it’s important: Optimized images improve page load speed and help with search engine rankings.

How to do it:

  • Rename images descriptively (e.g., “easy_yoga_pose.jpg” instead of “IMG1234.jpg”).
  • Add alt text for accessibility and SEO.

Helpful Tools:

  • TinyPNG to compress images.
  • Canva to create or edit visuals.

6. Improve Page Load Speed

Why it’s important: Search engines prioritize fast-loading sites, and visitors are more likely to stay on pages that load quickly.

How to do it:

  • Minimize large files like videos and images.
  • Use caching plugins like WP Rocket for WordPress.
  • Test your site’s speed with PageSpeed Insights.

7. Make Your Website Mobile-Friendly

Why it’s important: More than half of web traffic comes from mobile devices. A mobile-friendly site is essential for good SEO.

How to do it:

  • Use responsive website themes or builders like Wix or Squarespace.
  • Test your site using Google’s Mobile-Friendly Test.

8. Build Internal Links

Why it’s important: Internal links help guide users through your site and show search engines how your content is connected.

How to do it:

  • Add links to related blog posts or pages on your site.
  • Use descriptive anchor text (e.g., “Learn how to make a content calendar” instead of “click here”).

Example:

  • “Want more tips? Check out our guide to branding.”

9. Get Backlinks

Why it’s important: Backlinks from other sites show search engines your site is credible and worth ranking higher.

How to do it:

  • Reach out to bloggers or influencers in your niche.
  • Create high-quality content that people will want to share.
  • Write guest posts for other sites and include a link back to your own.

Helpful Resource: Learn how to get backlinks with this guide from Moz.

10. Monitor Your Results

Why it’s important: Tracking performance helps you see what’s working and adjust your strategy.

How to do it:

  • Use Google Analytics to check visitor stats.
  • Use Google Search Console to monitor search performance and fix any errors.

Tip: Look for trends, like which keywords bring the most traffic or which pages have high bounce rates.

Final Tip: Start Small, Grow Big

Begin with easy changes like optimizing titles and meta descriptions, then gradually tackle bigger tasks like link-building. Consistency is key.

SEO Worksheet for Beginners

Section 1: Keyword Research

What are your main topics or themes?

  • Example: Yoga, Baking, DIY Projects

List 5-10 potential keywords related to these topics:

1

2

3

4

5

6

7

8

9

10

Which tools will you use to find keywords?

  • Google Keyword Planner
  • Jaaxy
  • Ubersuggest

Section 2: Page Titles

Write 2-3 potential titles for your page or blog post:

1

2

3

Tips for crafting titles:

  • Include your main keyword near the beginning.
  • Keep it under 60 characters.

Section 3: Meta Descriptions

Write a short meta description (150-160 characters):

_________________________________________________________________________

Tips for writing meta descriptions:

  • Use active language (e.g., “Learn how to…”).
  • Include your main keyword.

Section 4: Headings (H1, H2, H3)

Outline your headings for the page or blog post:

  • H1: _______________________________________________________
  • H2: _______________________________________________________
  • H3: _______________________________________________________

Tips for headings:

  • Use keywords naturally in your headings.
  • Organize content logically.

Section 5: Internal Links

Identify 2-3 pages on your site to link to:

  1. Link Text
  2. Link Text
  3. Link Text

Why internal linking matters:

  • Guides users to relevant content.
  • Improves your site’s navigation.

Section 6: Images and Alt Text

List the images you’ll use and write alt text for each:

  1. Image: ______________________ Alt Text: “___________________________________________________”
  2. Image: ______________________ Alt Text: “___________________________________________________”

Tips for optimizing images:

  • Use descriptive file names.
  • Keep file sizes small (use tools like TinyPNG).

Section 7: Backlinks

List 2-3 sites or blogs to contact for backlinks:

Ideas for earning backlinks:

  • Share your content with relevant communities.
  • Write guest posts for other blogs.

Section 8: Monitoring Results

Tools to track your progress:

What metrics will you monitor?

  • Traffic to specific pages
  • Keywords bringing the most visitors
  • Pages with high bounce rates

Final Tip: Work on one section at a time and revisit your SEO efforts regularly to see improvement!

Here’s a little transparency: My website contains affiliate links. This means if you click and make a purchase, I may receive a small commission. Don’t worry, there’s no extra cost to you. It’s a simple way you can support my mission to bring you quality content.”
Off-Page SEO Checklist for Beginners

Off-Page SEO Checklist for Beginners

This checklist is your friendly guide to understanding and implementing Off-Page SEO. Off-Page SEO simply refers to actions taken outside your website that help improve your website’s visibility and ranking on search engines like Google. Let’s dive in step by step, so you can confidently build your online presence.


1. Understand the Basics of Off-Page SEO

Before diving into the tasks, let’s get clear on the goal:

  • Off-Page SEO helps search engines see your website as trustworthy and popular.

This is mainly achieved through getting links, mentions, and attention from other websites or platforms.

2. Build High-Quality Backlinks

Backlinks are links from other websites to your website. They act like votes of confidence for your content.

  • Reach Out to Trusted Sites in Your Niche:

Look for blogs, forums, or websites related to your business and ask if they’ll link to your site. Start small!

  • Guest Posting:

Write articles for other websites with a link back to your site. Many websites allow this, and it’s a great way to share your expertise.

  • Use Online Directories:

Submit your website to trusted directories like Google Business Profile or niche-specific directories.

  • Fix Broken Links:

Search for broken links on other websites (using tools like Broken Link Checker) and suggest your content as a replacement.

3. Social Media Engagement

Your social media presence is a key part of Off-Page SEO. Even if you don’t have a website yet, start building a following!

  • Create Profiles for Your Business:

Set up accounts on platforms like Facebook, Instagram, LinkedIn, Pinterest, or Twitter.

  • Share Your Content:

Post links to your articles, products, or services. Encourage followers to share them too.

  • Engage with Others:

Like, comment, and respond to your audience to build trust and relationships.

  • Join Groups and Communities:

Share your expertise in relevant groups, forums, or discussion boards.

4. Local SEO Strategies

If you have a local business, focus on these steps:

  • Claim Your Google Business Profile:

Fill in your details completely and ask for customer reviews.

  • Get Listed on Local Directories:

Examples include Yelp, TripAdvisor, and niche directories specific to your industry.

  • Encourage Customer Reviews:

Politely ask happy customers to leave reviews on platforms like Google or Facebook.

5. Build Relationships Online

The more connections you have, the more opportunities you’ll create for backlinks and partnerships.

  • Collaborate with Other Websites:

Partner with other businesses for promotions or joint content.

  • Participate in Forums and Communities:

Look for forums like Reddit, Quora, or niche-specific platforms to answer questions and share helpful insights.

  • Comment on Blog Posts:

Find blogs related to your business and leave thoughtful comments. Don’t spam; aim to add value!

6. Leverage Influencer Marketing

Partner with influencers who share your target audience.

  • Find Micro-Influencers:

Smaller influencers can often provide great results at a lower cost.

  • Offer Free Products or Services:

In exchange, ask for reviews or shoutouts.

  • Collaborate on Content:

Work together on blog posts, videos, or social media content.

7. Track Mentions of Your Brand

Being mentioned online without a link to your site can still help.

  • Use Tools to Monitor Mentions:

Tools like Google Alerts or BrandMentions can notify you when someone talks about your business.

  • Reach Out for Links:

If someone mentions your brand, ask if they’d be willing to add a link to your website.

8. Share Visual Content

People love visuals, and sharing them can generate attention and backlinks.

  • Create Infographics:

These are easy to share and often get linked back to your site.

  • Post Videos on YouTube:

Link back to your website in the description.

  • Use High-Quality Images:

Share them on Pinterest or Instagram with links to your site.

9. Use Content Syndication

Republish your articles or content on other platforms to reach new audiences.

  • Use Medium or LinkedIn Articles:

These platforms allow you to republish your content with links to your website.

  • Collaborate with Blogs:

Let other sites share your content in exchange for a backlink.

10. Build a Strong Online Reputation

Search engines prioritize trustworthy websites, so focus on:

  • Encouraging Positive Reviews:

Respond to reviews politely, even negative ones.

  • Maintaining Consistency:

Ensure your business name, address, and contact details match everywhere online.

  • Responding to Comments:

Whether on social media, forums, or review platforms, always engage positively.

11. Track and Improve

Your efforts will grow stronger as you monitor and refine your strategy.

  • Use Tools Like Ahrefs, Moz, or Ubersuggest:

These can help you analyze backlinks and keyword rankings.

  • Check Your Traffic Sources:

Tools like Google Analytics show where your visitors are coming from.

  • Adjust Your Strategy: If something isn’t working, try another approach.

And Finally…

Remember, Off-Page SEO is a long-term game. Be patient and consistent, and the results will come. Wealthy Affiliate has excellent tools and a supportive community to help you if you’re feeling stuck.

Start small, follow this checklist, and celebrate your wins along the way

Getting Started With Canva

Getting Started With Canva

Canva course

Embarking on your journey into graphic design can feel daunting, especially if you’re new to online tools. Canva, a user-friendly design platform, simplifies this process, enabling you to create professional-looking graphics with ease.

Whether you’re aiming to design social media posts, presentations, or personal projects, Canva provides an intuitive interface tailored for beginners.

In this guide, I’ll walk you through the initial steps to get started with Canva, By the end you’ll have produced your first design.

1. Sign Up for Canva

  • Visit the Canva Website: Navigate to www.canva.com.
  • Create an Account: Click on the “Sign up” button. You can register using your email address, Google, or Facebook account.

2. Explore the Canva Dashboard

There is a lot to take in on this page so it can feel rather daunting.  Just take it one step at a time and you’ll be fine.

Let’s start a design together.

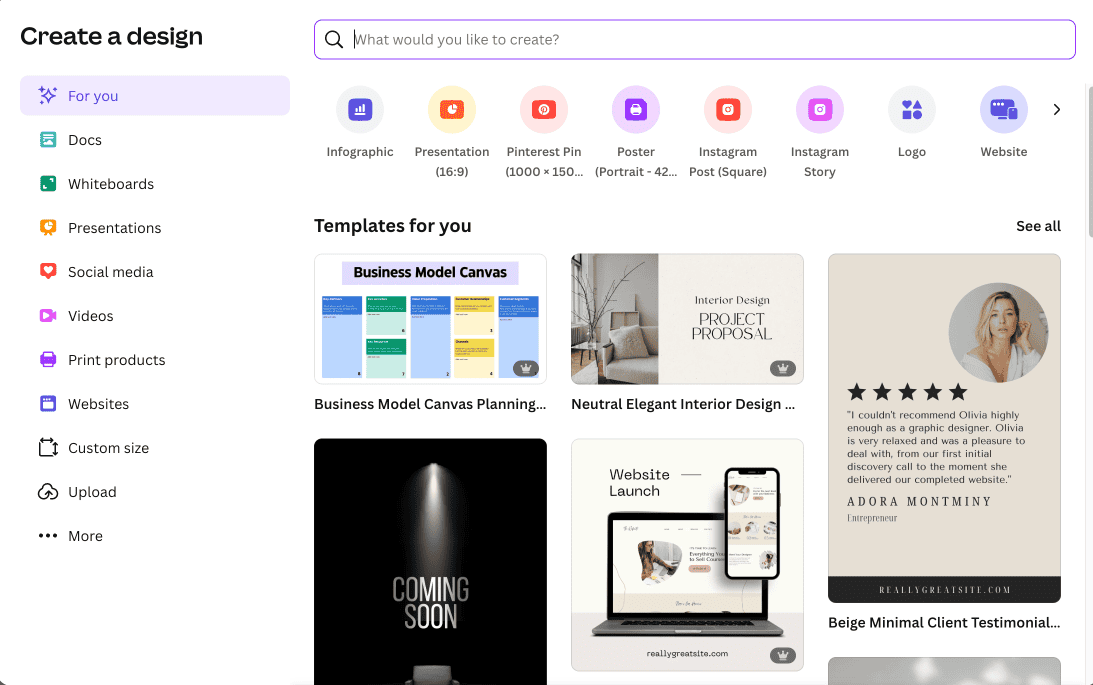
Click ‘Create a Design’ in the purple box on the top left.

This brings you to this page.

Canva template

If you click on the arrow, top right, you can scroll through each template category.

I am going to choose ‘blog graphic’

Whichever template you choose, you will now have a blank canvas to play with. 

If you want to create your own design from scratch, go ahead.  For this tutorial, I’m using a template.

I am using the premium version of Canva but you can easily create beautiful designs with the free version.


Click on a template you like. (We’ll look at styles another time).

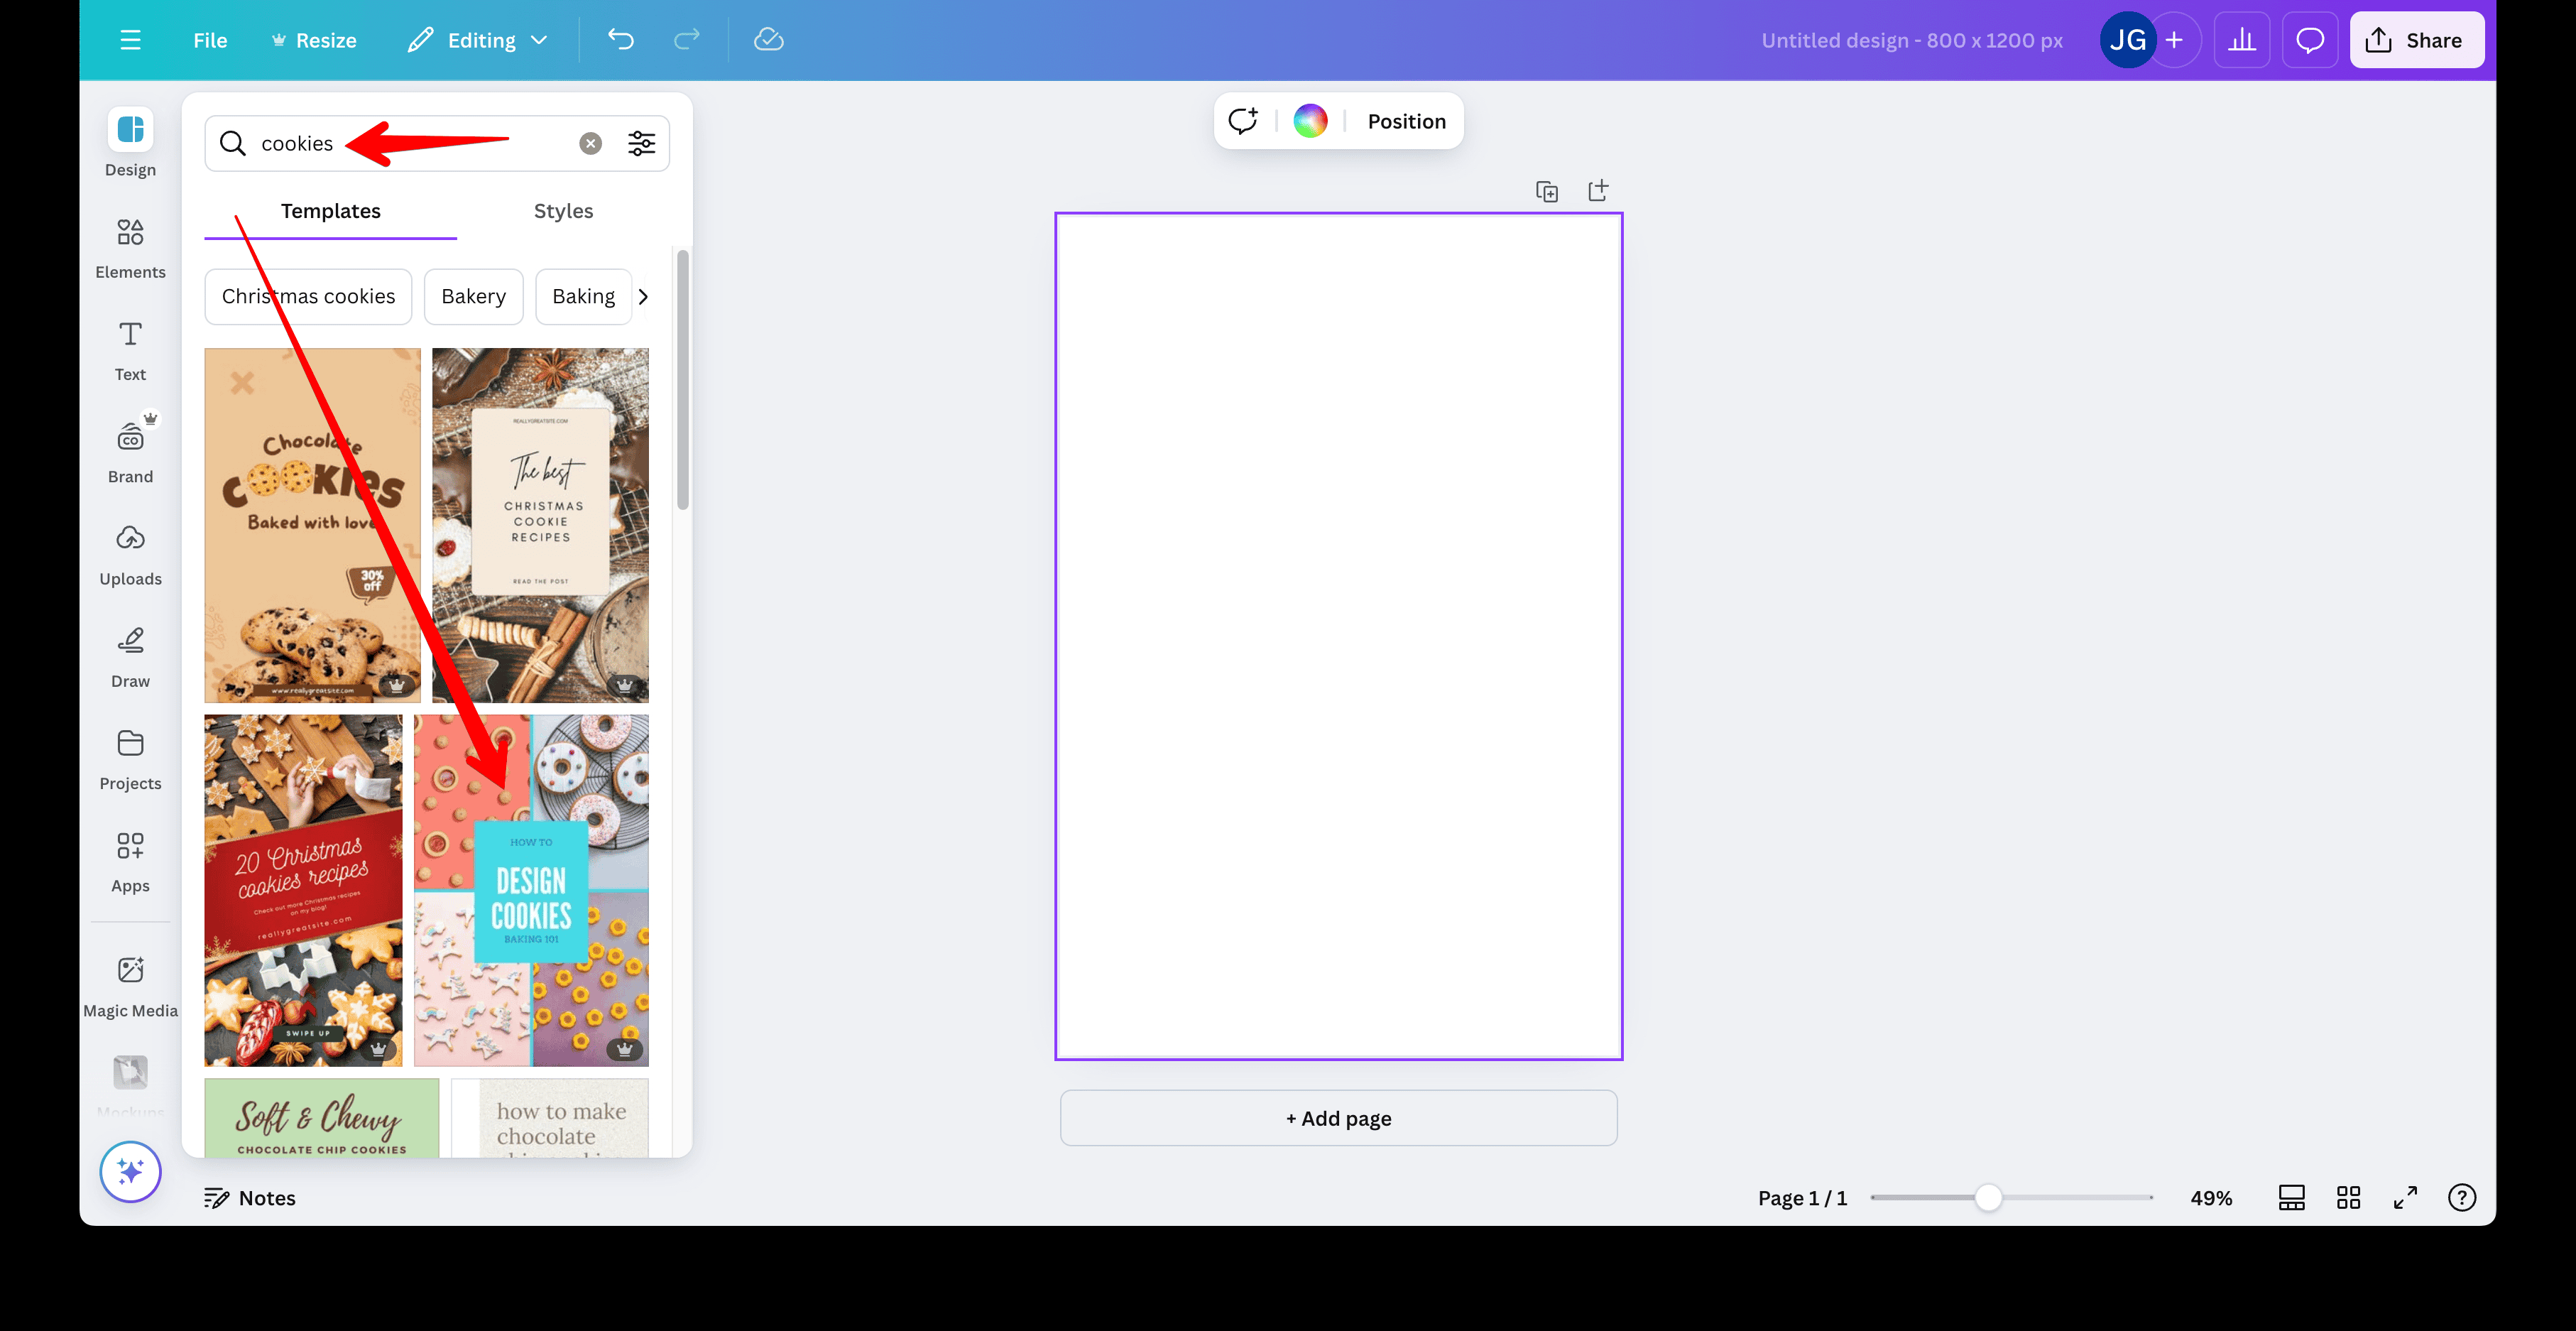
If you want a template for a particular use the search bar.  For example, ‘cookies’ will bring up the relevant templates.

As you can change all the aspects of a template it doesn’t matter if you want to use a e.g.  ‘cookies’ template for a ‘wrestling’ topic.

Canva cookies

Customise The Template

I’m choosing this ‘cookies’ template.

Click on the template you want to use and it will be placed onto your canvas.

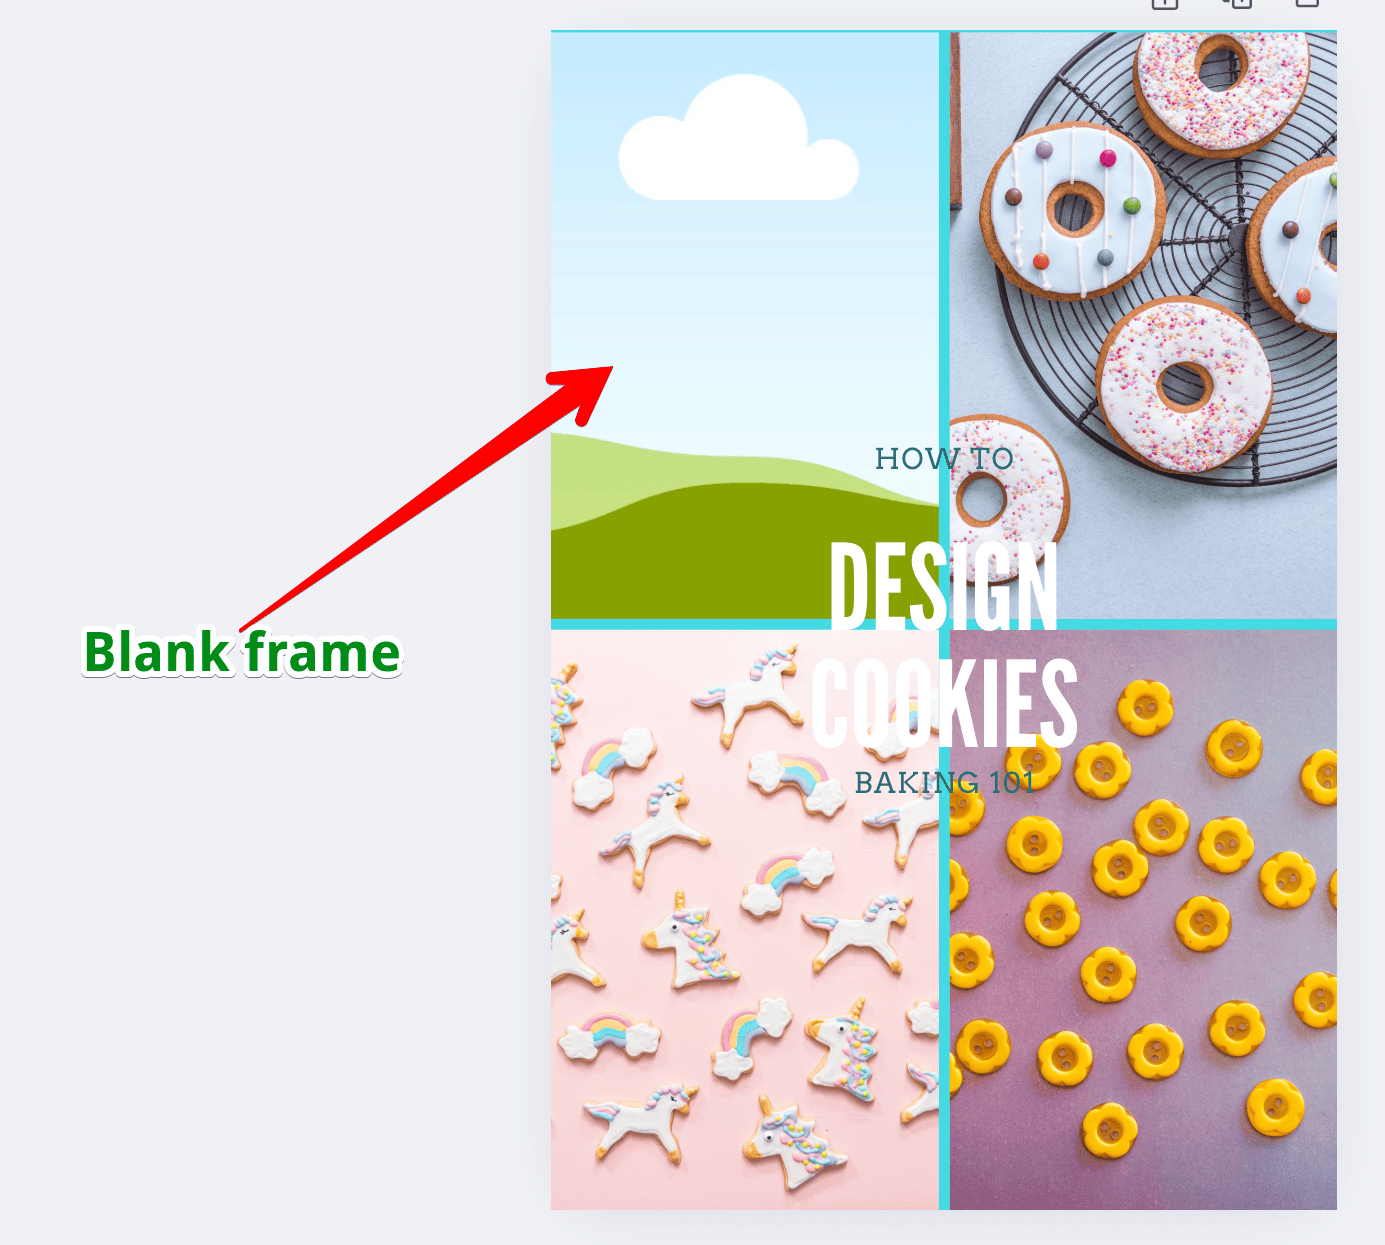
Double click on an image to delete it.  You’ll be able to see the blank frame behind it.  ( It looks like sky and green fields)

blank frame

Click on an area.  In this case, the blank frame.

Click on elements on the left menu bar.

I’m choosing ‘wrestling’ ( I have absolutely no interest in wrestling whasoever but as I’d mentioned it before – here it is!!)

I’ve written ‘wrestling’ in the search bar and now you can see the  content to do with wrestling.  Remember I’m using the premium version so I have loads more options.

Click on the image you want and it will fit itself into the blank frame.  If it needs to be moved about, double click on the image and move it.  When it is in the right place, click outside of the image and it will stay in the frame.

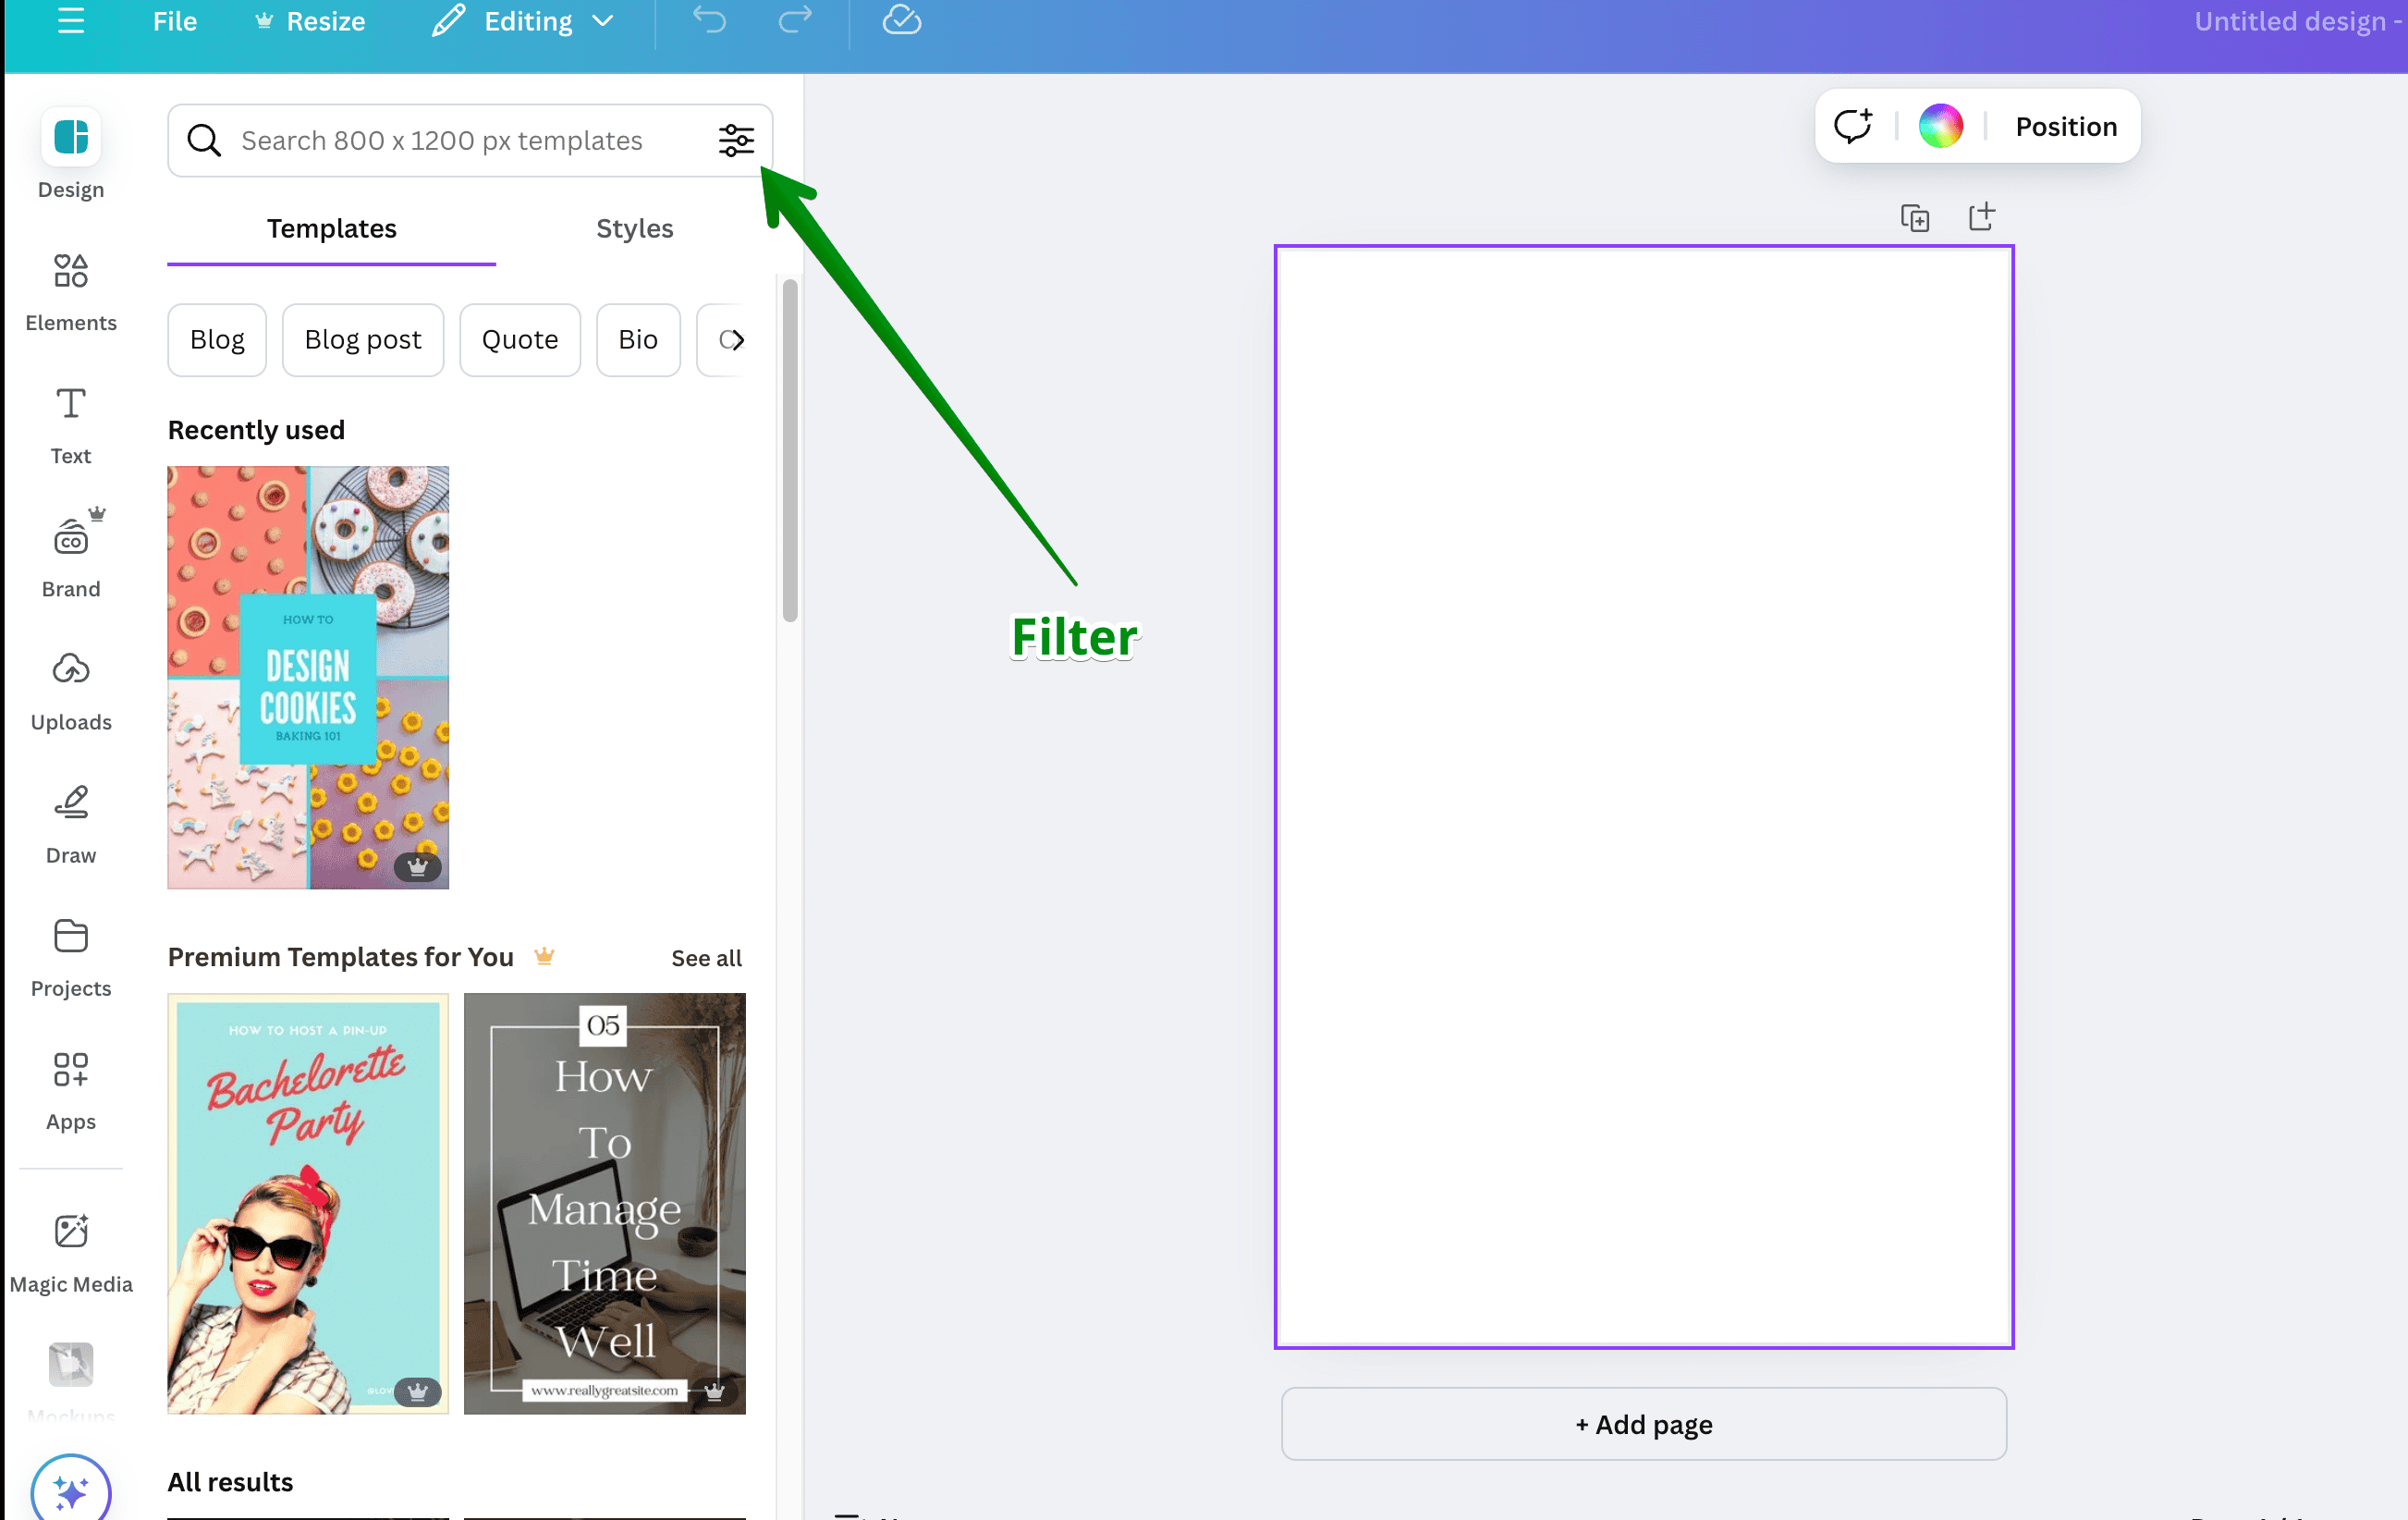
If you click on the icon next to the search box you can filter and choose the free options.

Canva filter

Go through and change any other images.

Now we’ll work on the text.

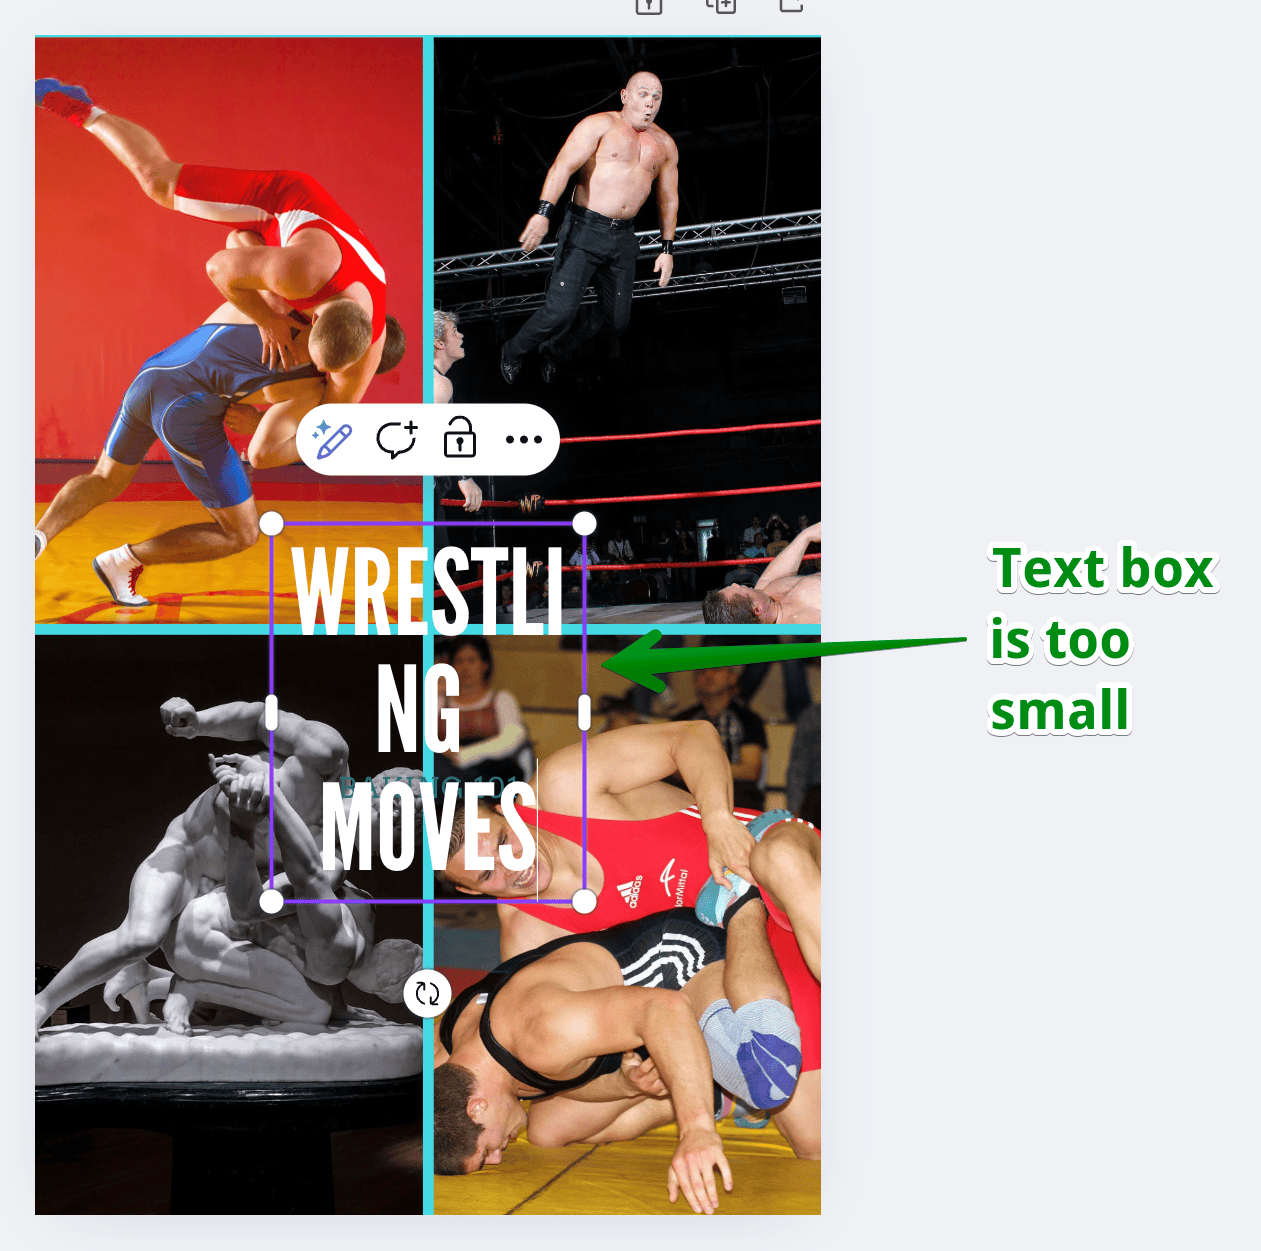
To change the font, click on it in the design to highlight it.  The edit box will appear at the top of the canvas.  From here you can change the font to look however you want.  When you have changed the font, if the box is too small (or big), click on one of the sides or corners and move in or out as necessary.  Alternatively, change the size of the font using the font size box in the edit box.

Text box too small

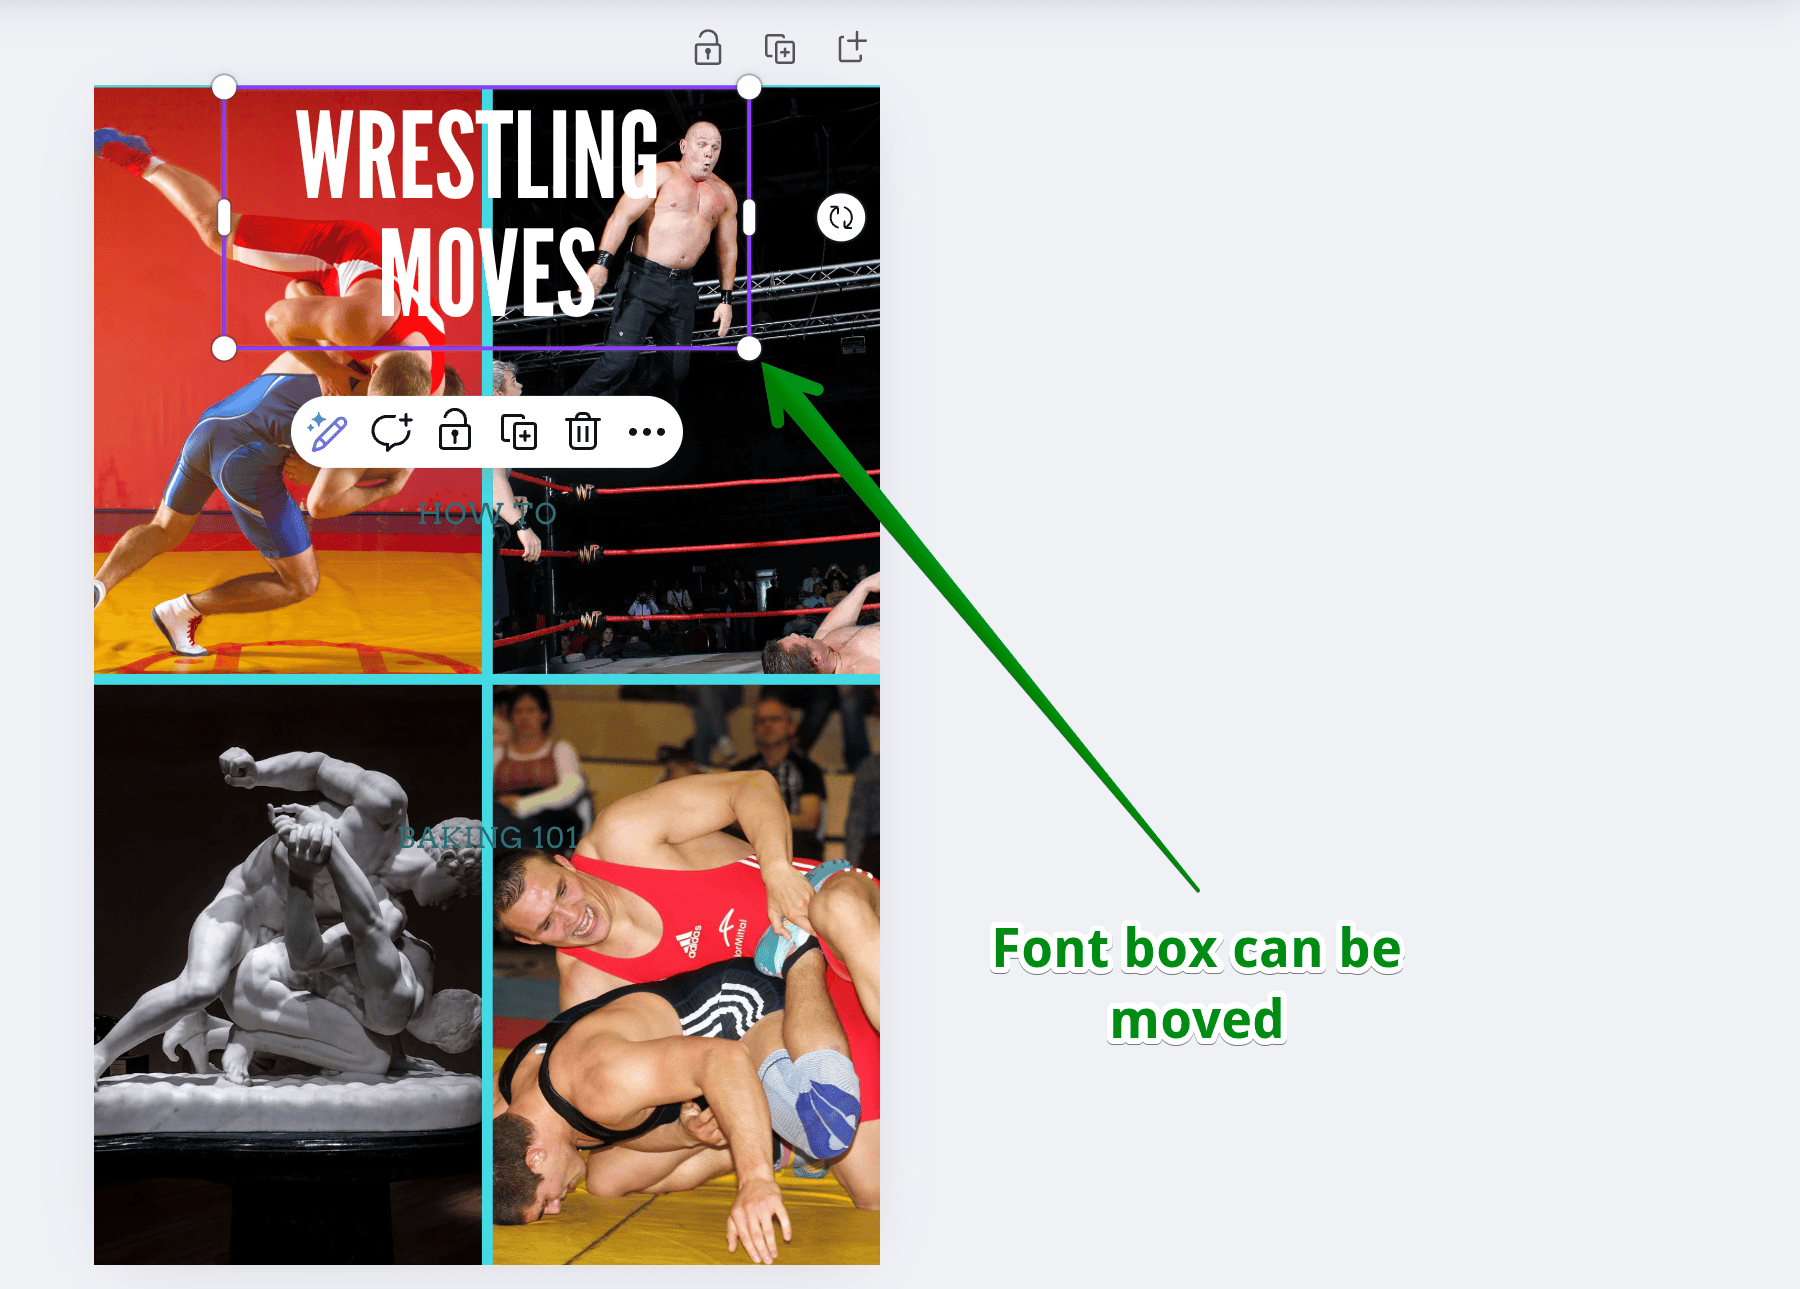
The text box can be moved around your canvas to wherever you want it placed.  Just keep your finger on the mouse/pad and move the box. 

Repeat with any other images and text boxes.  

If you want to add more text boxes, click ‘text’ on the left menu,  choose the type of text, eg heading, body etc, click and add the text.

Font box moved

Save And Download

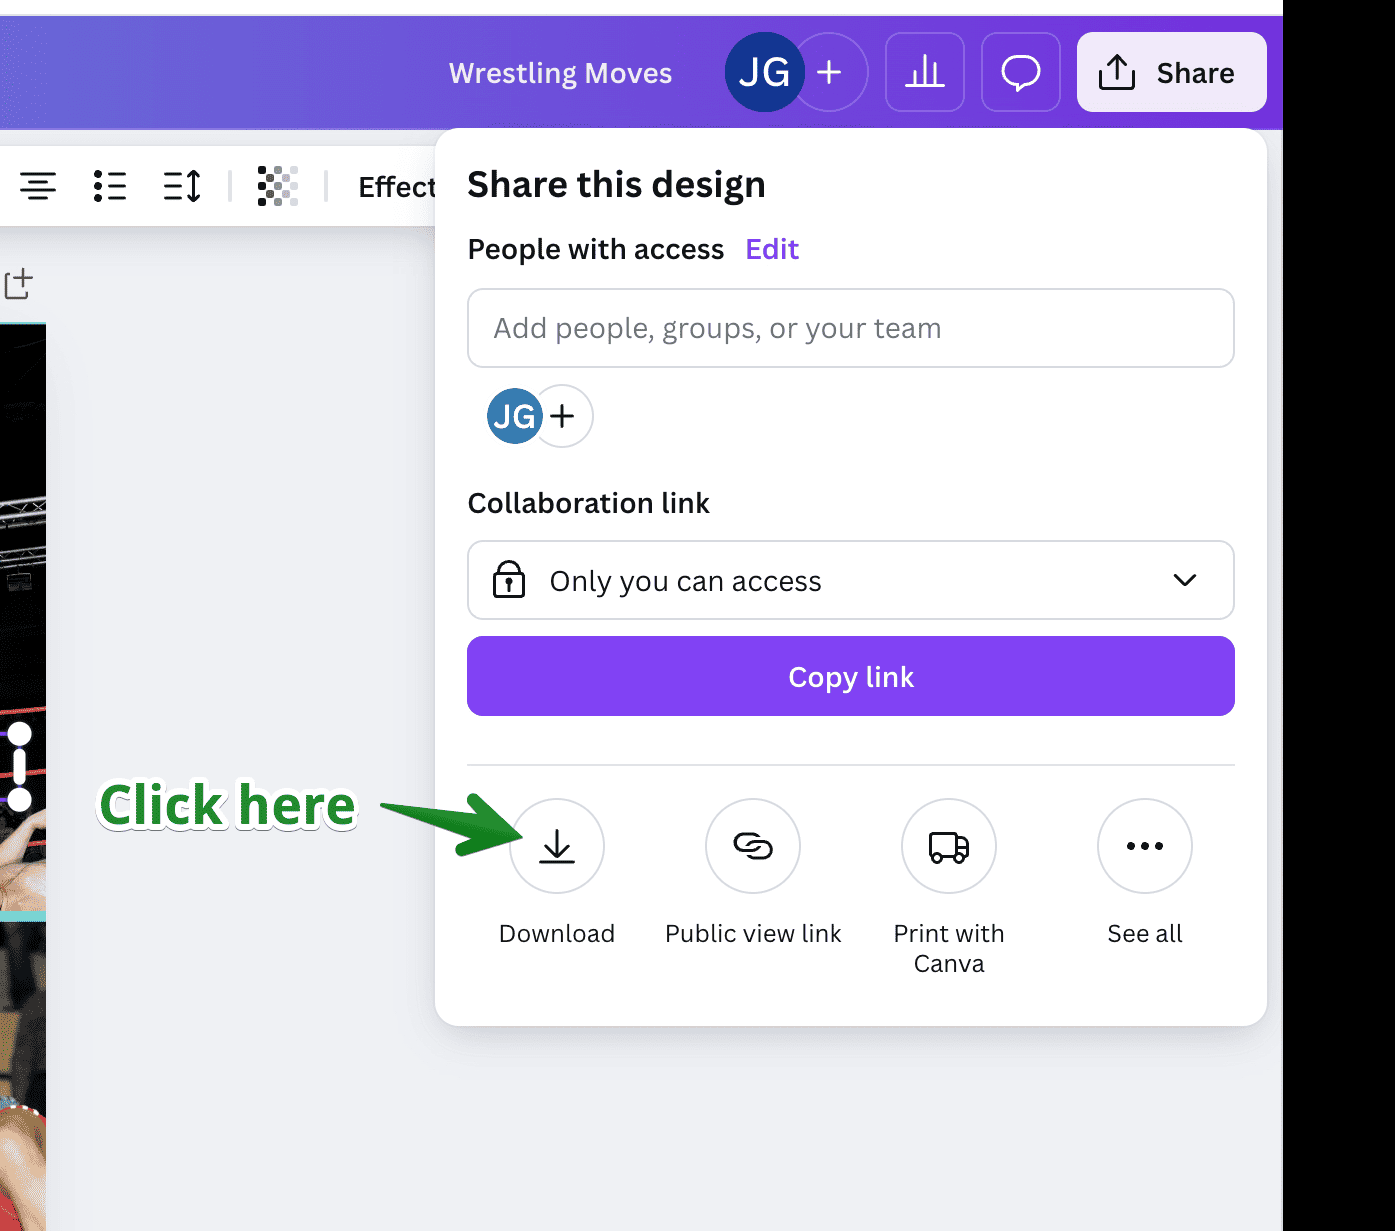
When you have finished your design, you can save it by clicking ‘share’ on the top right of canva, click on ‘download’ and a nw box will open.  Click ‘download’ again.  Save to wherever you want your image saved.

And voila, you have your first Canva design to use on your website, social media, business card – wherever you want.  

Save canva

And Finally...

Starting with Canva opens up a world of creative possibilities whether you are bereft of creativity (like me) or have the creative flair of Michelangelo.  By following this step by step guide, you’ve taken the first steps toward producing professional-looking designs.  

Remember, practice is the key and becoming familiar with the dashboard.  As you experiment with different features and tools, your confidence and proficiency will grow.  

I look forward to seeing in the next episode in the Canva Series.

Happy Designing

Getting Started

Getting Started

What Do You Need for Online Marketing?

If you’re starting a website and want people to visit it, you need online marketing. It’s like putting up signs or making announcements to tell people about your website. But to do this, you’ll need some tools and resources—kind of like having the right supplies for a project.

Here’s a simple guide to the basic resources you’ll need for online marketing.

1. A Website

First things first: you need a website! This is your online home where people can visit, learn about you, and maybe buy your products. Think of it like your shop on the internet.

  • How to Get One: Use a website builder like Wix, Squarespace, or WordPress. They make it easy for beginners to create a site.  This site is made using WordPress and a theme called Divi.

2. A Good Domain Name

Your domain name is your website’s address, like www.getonlinestepbystep.com. It should be:

  • Easy to remember.
  • Simple to type.
  • Related to what your website is about.

For example, if you’re selling cookies, a domain name like www.cookiesking.com would be perfect.

3. An Email List

An email list is like a group of people who want to hear from you. You can send them updates, tips, or special offers.

  • How to Start:

Use tools like Mailchimp or Constant Contact to collect email addresses and send newsletters.  More on this later.

Why It’s Important:

Email is a direct way to talk to your audience. It’s like sending letters to your friends!

4. Social Media Accounts

Social media is where lots of people hang out online. Platforms like Instagram, Facebook, TikTok, and X (formally Twitter) are great for sharing updates about your website. This is a huge area and we’ll cover it all later.

  • Start Small: Choose 1-2 platforms where your audience is likely to be.
  • What to Post: Share fun photos, tips, or news about your site.

5. Content Creation Tools

You’ll need tools to make relevant and interesting content for your website and social media. Content is what grabs people’s attention and keeps them interested in what you’re offering.

  • Writing Tools:

Use Google Docs or Grammarly to write articles, posts, or emails.

  • Graphic Design Tools:

Canva is an easy tool to create pictures, banners, or ads for your website and social media.

  • Video Tools:

Apps like iMovie or CapCut help you make simple videos

6. Analytics Tools

How do you know if your online marketing is working? That’s where analytics come in. These tools tell you how many people visit your site, what they look at, and where they come from.

  • Free Tool:

Google Analytics is a free way to track your website visitors.

  • Why It’s Helpful:

It’s like a report card for your website—you’ll see what’s going well and what needs improvement.

7. Keyword Research Tools

If you want people to find your website on Google, you need the right keywords. These are the words people type into the search bar, like “best cookies for kids” or “how to bake cookies.”

  • Free Tools:

Google Keyword Planner and Ubersuggest are great for beginners.

  • Why It’s Important:

Using the right keywords helps your website show up in search results.

8. Advertising Budget

Sometimes, you’ll want to pay for ads to reach more people. This doesn’t have to cost a lot—you can start small.

  • Where to Advertise:

Google Ads, Facebook Ads, or Instagram Ads.

  • Why It Helps:

Ads can quickly bring people to your website.

9. Time and Creativity

Marketing isn’t just about tools—it’s about YOU! You need time to:

  • Think of creative ideas.
  • Write posts and articles.
  • Interact with your audience.

It’s like watering a plant—it grows when you give it care and attention.

10. Help from Tools and People

Sometimes, you’ll need extra help. Here are a few options:

  • Freelancers: You can hire someone to write, design, or manage your social media.
  • Marketing Tools: Use apps like Buffer (to schedule posts) or Hootsuite (to manage social media).
  • ChatGPT: An AI Tool

A Fun Example: Your Cookie Website

Let’s say you’re creating a website to sell cookies. Here’s how these resources work together:

  1. Website: Build a site called www.cookiesking.com.
  2. Domain Name: Use a simple and catchy address.
  3. Email List: Collect emails to send special cookie recipes.
  4. Social Media: Post pictures of your cookies on Instagram and TikTok.
  5. Content Creation: Write blog posts like “5 Tips for Perfect Chocolate Chip Cookies.”
  6. Analytics: Use Google Analytics to see which cookie flavor is most popular.
  7. Keywords: Use “best cookies for parties” in your content so people find your site.
  8. Ads: Run a small Facebook ad to promote a cookie sale.

Start Small and Grow

You don’t need everything all at once. Start with the basics:

  1. Create a simple website.
  2. Share your site on social media.
  3. Write one great piece of content.

As you learn and grow, you can add more tools and resources. Before you know it, you’ll be an online marketing expert! 

Here’s a little transparency: My website contains affiliate links. This means if you click and make a purchase, I may receive a small commission. Don’t worry, there’s no extra cost to you. It’s a simple way you can support my mission to bring you quality content.”